|
Yep it is the time of year to start cranking out all the Fall drinks such as hot chocolate and coffee and all the hot drinks that make Fall feel like Fall. I decided it was about time to make some hot chocolate. So here's my recipe! Cause sorry, but you can't just you a packet. Made from scratch is the best. 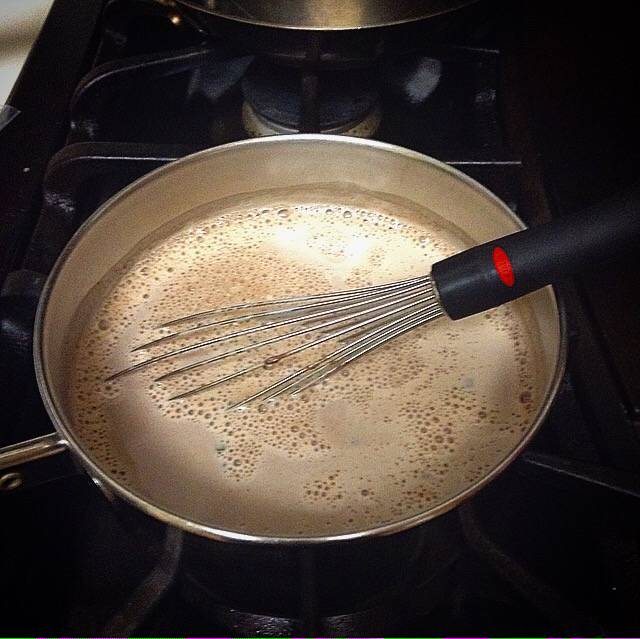   Here's what you'll need!
2 cups of milk. 1 1/2 tablespoons of coco powder. 1/4 teaspoon of vanilla extract. A pinch of salt. A couple of pieces of dark chocolate. (You could a tablespoon of dark chocolate chips.) About 1/6 cup of sugar. (More of you like it sweeter.) I'm not completely sure of the exact measurements I actually use. 😃 Instructions: In a saucepan heat the milk then add the sugar and salt and stir until dissolved. Then add your vanilla. Let it come to a slight boil then add your coco powder. Stir until all the coco powder lumps are gone. Then had your dark chocolate and stir until completely melted. Then enjoy! ☕️ (If you are like me you'll curl up in your favorite chair with a big fuzzy blanket and watch a Little House On The Prairie. I grew up watching it and I'll never quit loving it!) Happy Fall Y'all! 🍂🍁🍃 When our family first moved into the house we were in, the bathroom that us girls share was very much put together for younger children. While we did change a few things, it is still mostly the same. After a series of events including our towel rack falling off the wall creating two holes in the wall, we have decided that we (I) need to redo the bathroom and make it a little bit more grown up looking. It is going to take a while seeing as I'm also doing school and working, but last week I got the wholes in the walls fixed! It took me a while to do the first one but the second one was quite a bit faster. Here's a couple of before and after pictures. Before: In the process: 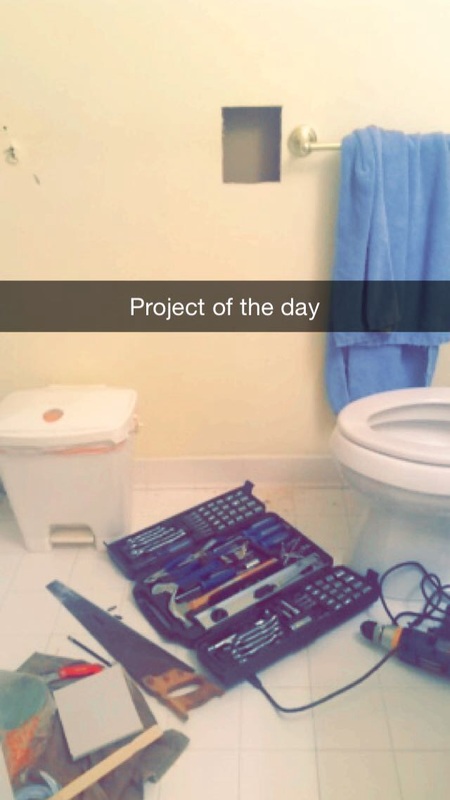 The Simi-Finished Product!!! (At this point I still had to sand and reapply the Joint Compound.) 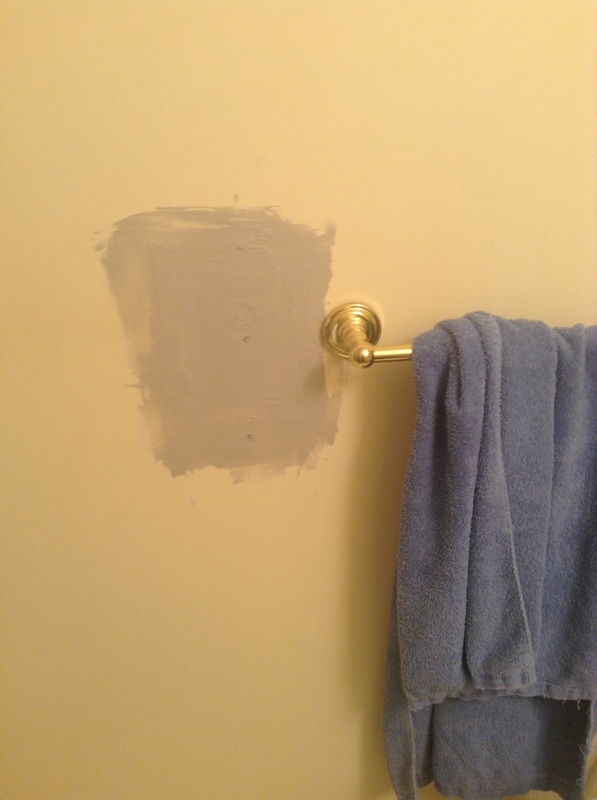 Now all I have left to do is paint and redo fixtures. Pictures coming (as soon as i get the project done.)
Thanks to YouTube instructional videos and also some advice from a builder that goes to our church, I think the wall project turned out pretty well. The process was pretty uncomplicated. (For any that are interested or have a wall they want to fix themselves, here's a list of the stuff I used and also how I did it.) Materials: 1/2 inch thick 2 square foot sheet of sheet rock. Fiber Tape Joint Compound Sheetrock screws A piece of wood. (I used a paint stick) Tools: Measuring tape Pencil Saw Exacto Knife or Box Cutter Drill How To: I started buy measuring the holes in the wall. You wanted to add about an inch to all four sides of the whole. Measure and mark your new sheet rock to the desired size making sure to use a ruler or a straight edge to ensure that the sides are as straight as possible. Next take your box cutter or Exacto Knife and cut through the paper layer of the sheet rock. (This helps in in cutting the entire piece out and helps to guide your saw.) Next take your saw and cut the piece out. Place the new sheet rock over the hole and trace the perimeter onto the wall. Again take your box cutter and cute the traced line that is on the wall making sure you cute through the paper layer of the sheet rock. Then cut angles going in towards the hole. Take your saw and insert it in the hole. Cute towards the outside edge and when the part of the wall is someone loose pivot it away from the wall being careful not to chip the rest of the surrounding sheet rock. Once your hole is clear insert your new piece of sheet rock to make sure it fits. It should fit snugly but you shouldn't have to push. If it doesn't quite fit take your box cutter and shave down the sides of your hole to make it a better fit. Once you have it to where it will fit snugly stick your paint stick or piece of wood into the hole. Screw it into the wall at the top and the bottom of the hole. Insert your new sheet rock and screw one more screw into the middle of the sheet rock making sure the screw goes through the piece of wood. Next take fiber tape and put it around the perimeter of the repaired spot. the last step is to apply the Joint Compound to the entire area including the screws above and below the repair site. Get the Joint Compound as smooth as possible, however it doesn't have to be perfect the firs time around. After 24 hours you are going to sand down the Joint Compound until it is completely smooth then reapply. Again it doesn't have to be perfect because you are going to repeat this process one last time before you are done. You do, however, want to get it as smooth as you can so that it is easier to finish off. And there you have it! I had a blast doing it and I'm really looking forward to the whole bathroom make over! :-D |

About Me
Hi! My name is Bethany. I'm so glad you've stopped in at my little corner of the internet! By way of introduction, I am a wife, musician, teacher, coffee lover, baker, nature lover, writer, and most importantly, I am a follower of Jesus. I'm super thankful that the Lord has given me this little outlet to share some of the things He has taught me, things that have inspired me, changed me or just gotten me excited about living life. My prayer is that what you read and see here will be an encouragement to your heart, bring you joy, and maybe even inspire you! Archives
December 2020
Categories
All
|


 RSS Feed
